
原文地址: http://codepen.io/Mamboleoo/post/tunnel-animation-1
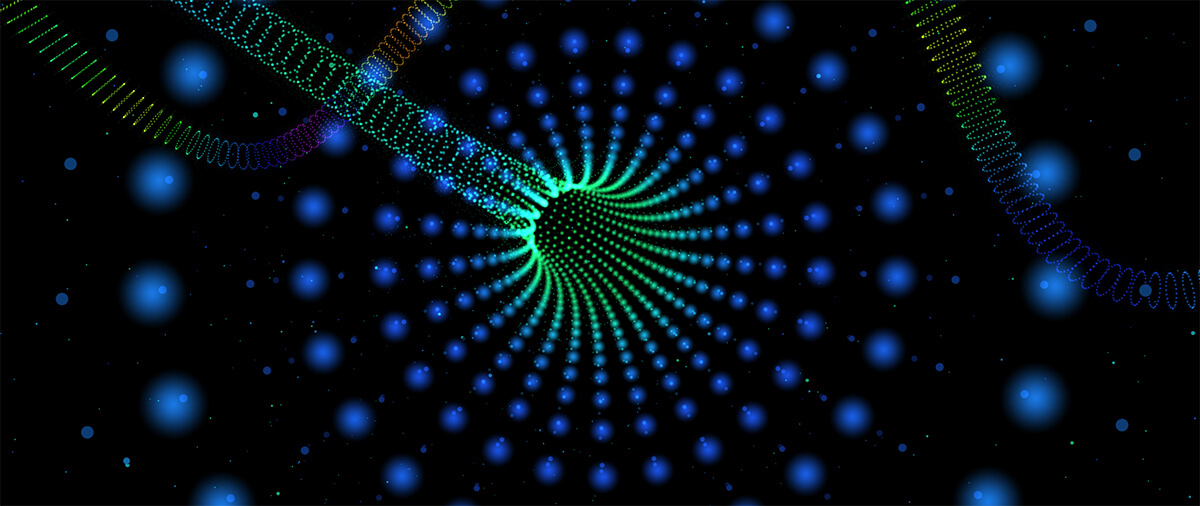
如果你对下面的效果非常好奇的话,那么今天这篇文章就是要告诉你们如何实现一个类 虫洞的特效动画。
同样我也在 agency’s 2017 使用了这样的效果。而我将在这篇文章中解释其中的原理和基本实现。
我们需要创建一个管道然后在里面会设置一个相机运动。然后我们会丰富我们这个管道的外在样子。
我们使用了 Three.js 来完成基本的动画,如果你对 Three.js 不怎么了解,你可以先阅读 Rachel Smith's posts 来了解一些基本知识。
建立场景
作者使用的codepen编辑,不过这里会补上欠缺的
首先我们加入一些基本 Three.js 代码来实现 一个基本的 Three.js Demo.
- 在 html 代码中添加 canvas
<!DOCTYPE html>
<html>
  <head>
    <meta http-equiv="Content-type" content="text/html; charset=utf-8"/>
    <meta name="viewport" content="width=device-width,user-scalable=0,initial-scale=1,maximum-scale=1">
    <title>Tunnel Aniamtion</title>
    <link href="./style.css" rel="stylesheet" />
</head>
  <body>
    <canvas></canvas>
    <script src="https://cdnjs.cloudflare.com/ajax/libs/three.js/84/three.min.js"></script>
    <script type="text/javascript" src="./main.js"></script>
  </body>
</html>
- 然后我们添加一些基本的样式
body{
  overflow: hidden;
  margin:0;
}
canvas{
  position: absolute;
  top: 0;
  left: 0;
  width: 100%;
  height:100%;
}
- 接下来我们实现基本的 JS 内容;
//Get window size
var ww = window.innerWidth,
  wh = window.innerHeight;

//Create a WebGL renderer
var renderer = new THREE.WebGLRenderer({
  canvas: document.querySelector("canvas")
});
renderer.setSize(ww, wh);

//Create an empty scene
var scene = new THREE.Scene();

//Create a perpsective camera
var camera = new THREE.PerspectiveCamera(45, ww / wh, 0.001, 1000);
camera.position.z = 100;

//Create a basic cube to check if the setup works well
var cubeGeom = new THREE.BoxGeometry(30,30,30);
var cubeMat = new THREE.MeshBasicMaterial({color:0x3498db});
var cube = new THREE.Mesh(cubeGeom, cubeMat);
scene.add(cube);

function render(){

  cube.rotation.y += 0.02;

  //Render the scene
  renderer.render(scene, camera);

  requestAnimationFrame(render);
}
requestAnimationFrame(render);
效果如下:
See the Pen Setup the scene by Louis Hoebregts (@Mamboleoo) on CodePen.
你可以看到一个正方形在旋转
创建几何管道
在 Three.js 中创建管道你需要先创建一个路径。为了实现这个目标我们需要使用 THREE.CatmullRomCurve3()。它可以通过一组数组创建一个制转楔。
下面的示例就是通过 Vector3将一组数组转化为三维的,然后使用 THREE.CatmullRomCurve3 实例化一个CatmullRomCurve3对象 。
//Hard coded array of points
var points = [
  [0, 2],
  [2, 10],
  [-1, 15],
  [-3, 20],
  [0, 25]
];

//Convert the array of points into vertices
for (var i = 0; i < points.length; i++) {
  var x = points[i][0];
  var y = 0;
  var z = points[i][1];
  points[i] = new THREE.Vector3(x, y, z);
}
//Create a path from the points
var path = new THREE.CatmullRomCurve3(points);
创建好路径后,我们可以创建一个基于它的管道了。
//Create the tube geometry from the path
//1st param is the path
//2nd param is the amount of segments we want to make the tube
//3rd param is the radius of the tube
//4th param is the amount of segment along the radius
//5th param specify if we want the tube to be closed or not
var geometry = new THREE.TubeGeometry( path, 64, 2, 8, false );
//Basic red material
var material = new THREE.MeshBasicMaterial( { color: 0xff0000 } );
//Create a mesh
var tube = new THREE.Mesh( geometry, material );
//Add tube into the scene
scene.add( tube );
效果如下:
See the Pen Create a tube geometry by Louis Hoebregts (@Mamboleoo) on CodePen.
通过 svg polygon 创建管道
实际上让手写路径的点位置有点困难,你也可以使用一些随机算法来生成这些随机的点。然而我们还可以借助 Adobe illustrator 来创建几何图形,来获取 svg 的点数据。如果你没有使用任何贝塞尔曲线的图形,AI 导出来的路径数据可能是这种形式:
<svg viewBox="0 0 346.4 282.4">
    <polygon points="68.5,185.5 1,262.5 270.9,281.9 345.5,212.8 178,155.7 240.3,72.3 153.4,0.6 52.6,53.3 "/>
</svg>
然后我们可以手动的将它改为数组就像下面:
var points = [
    [68.5,185.5],
    [1,262.5],
    [270.9,281.9],
    [345.5,212.8],
    [178,155.7],
    [240.3,72.3],
    [153.4,0.6],
    [52.6,53.3],
    [68.5,185.5]
];
//Do not forget to set the last parameter to True, since we want our tube to be closed
var geometry = new THREE.TubeGeometry( path, 300, 2, 20, true );
效果如下,你可以看到这个管道按照我们设置的路径点来显示的。
See the Pen Create a tube from a SVG polygon by Louis Hoebregts (@Mamboleoo) on CodePen.
将相机放置在管道内部
现在我们实现了一个管道,但是这里还有非常重要的一块,就是 动画 。我们接下来需要非常实用的函数, path.getPointAt(t) 来获取在任意百分比下的点的坐标数据。百分比的值限于0-1。0是路径的第一个点的数据,1是最后一点的数据值。
而我们则需要利用和这个函数,在每一帧的时候调用他,然后设置 相机的坐标,从而让它沿着路径前进。
//Start the percentage at 0
var percentage = 0;
function render(){
  //Increase the percentage
  percentage += 0.001;
  //Get the point at the specific percentage
  var p1 = path.getPointAt(percentage%1);
  //Place the camera at the point
  camera.position.set(p1.x,p1.y,p1.z);

  renderer.render(scene, camera);
  requestAnimationFrame(render);
}
requestAnimationFrame(render);
getPointAt()只能接收0-1的值,因此我们不能让它超过 1。因此我们需要确保我们传递进去的值始终是不超过1的。
位置的问题我们解决了,但是相机的方向确实始终朝着一个方向。为了解决这个问题,我们必须让相机朝着路径相对远一点的方向看过去。在每一帧我们都会重新计算相机需要设置的点,以及相机需要看到点的位置。
var percentage = 0;
function render(){
  percentage += 0.001;
  var p1 = path.getPointAt(percentage%1);
  //Get another point along the path but further
  var p2 = path.getPointAt((percentage + 0.01)%1);
  camera.position.set(p1.x,p1.y,p1.z);
  //Rotate the camera into the orientation of the second point
  camera.lookAt(p2);

  renderer.render(scene, camera);
  requestAnimationFrame(render);
}
我们可以设置一些选项来设置材质,虽然我们有一个基本的材质,但是它的侧面看着像在外面。由于我们的相机是在管道内部,所以材料的材质需要进行翻转设置。由于我们目前场景中还没有引入灯光,我们可以将材质设置成线框,从而可以非常轻松的看到具体的运动效果。
var material = new THREE.MeshBasicMaterial({
  color: 0xff0000, //Red color
  side : THREE.BackSide, //Reverse the sides
  wireframe:true //Display the tube as a wireframe
});
现在我们可以看下具体的效果:
完整的 JS 代码:
var ww = window.innerWidth,
  wh = window.innerHeight;

//Create a WebGL renderer
var renderer = new THREE.WebGLRenderer({
  canvas: document.querySelector("canvas")
});
renderer.setSize(ww, wh);

//Create an empty scene
var scene = new THREE.Scene();

//Create a perpsective camera
var camera = new THREE.PerspectiveCamera(45, ww / wh, 0.001, 1000);
camera.position.z = 400;

//Array of points
var points = [
    [68.5,185.5],
    [1,262.5],
    [270.9,281.9],
    [345.5,212.8],
    [178,155.7],
    [240.3,72.3],
    [153.4,0.6],
    [52.6,53.3],
    [68.5,185.5]
];

//Convert the array of points into vertices
for (var i = 0; i < points.length; i++) {
  var x = points[i][0];
  var y = 0;
  var z = points[i][1];
  points[i] = new THREE.Vector3(x, y, z);
}
//Create a path from the points
var path = new THREE.CatmullRomCurve3(points);

//Create the tube geometry from the path
var geometry = new THREE.TubeGeometry( path, 300, 2, 20, true );
//Basic material
var material = new THREE.MeshBasicMaterial( { color: 0xff0000, side : THREE.BackSide, wireframe:true } );
//Create a mesh
var tube = new THREE.Mesh( geometry, material );
//Add tube into the scene
scene.add( tube );


var percentage = 0;
function render(){

  percentage += 0.001;
  var p1 = path.getPointAt(percentage%1);
  var p2 = path.getPointAt((percentage + 0.01)%1);
  camera.position.set(p1.x,p1.y,p1.z);
  camera.lookAt(p2);

  //Render the scene
  renderer.render(scene, camera);

  requestAnimationFrame(render);
}
requestAnimationFrame(render);
添加灯光
接下来我们将会在场景中引入灯光,但是我并不打算详细介绍灯光方面的详细使用。只是会告诉大家最基本的设置。
它设置的基本原理与相机类似,我们会将灯光设置在相机朝向的那个点上。
- 首先我们创建一个
PointLight然后将它添加到场景中去
//Create a point light in our scene
var light = new THREE.PointLight(0xffffff,1, 50);
scene.add(light);
- 接下来我们需要将我们的材质转换一下,让它看着受到光源的影响
var material = new THREE.MeshLambertMaterial({
  color: 0xff0000,
  side : THREE.BackSide
});
- 最后我们更新 render 的函数然后将光源加入到动画移动中来
var percentage = 0;
function render(){
  percentage += 0.0003;
  var p1 = path.getPointAt(percentage%1);
  var p2 = path.getPointAt((percentage + 0.02)%1);
  camera.position.set(p1.x,p1.y,p1.z);
  camera.lookAt(p2);
  light.position.set(p2.x, p2.y, p2.z);

  renderer.render(scene, camera);
  requestAnimationFrame(render);
}
效果如下:
See the Pen Add a light by Louis Hoebregts (@Mamboleoo) on CodePen.
更进一步
根据上面的一些步骤,通过改变一些参数,自己还实现了一些其他效果。如果你有兴趣可以查看具体源码。
下面这个动画,自己主要是给管道内壁表面设置了不同的颜色。
See the Pen Crazy 1 by Louis Hoebregts (@Mamboleoo) on CodePen.
下面这个动画,我修改了 Y 的Y坐标值,从而让管道看着是三维的。
See the Pen Crazy 2 by Louis Hoebregts (@Mamboleoo) on CodePen.
下面这个动画主要是设置了五个隧道,他们拥有不同的颜色和透明度。
See the Pen Crazy 3 by Louis Hoebregts (@Mamboleoo) on CodePen.
添加粒子效果
我们之前看到的都只是空白的几何管道,我们接下来可以添加一些分布的粒子。
计算粒子的位置
为了实现我们的效果,我们需要生成圆形的的粒子沿着我们设置的管道。
Three.js 会使用同样的方式去生成管道,不同的是它会在几何体添加表面。我们需要设置这些表面的一些细节,也就是你想要的颜色或者半径这些。
// 数量
var segments = 500;
// 粒子的数量每个切面
var circlesDetail = 10;
// 管道的半径
var radius = 5;
在知道我们所拥有的的粒子数量后,我们需要计算 弗莱纳标架。尽管我不是这方面的专家,但是就我所知,弗莱纳标架实际就是管道每一段的计算的值,每一帧都是有三个参数组成
- T 是单位切向量,方向指向粒子运动的方向。
- N 是切向量 T 对弧长参数的微分单位化得到的向量。
- B 是 T 和 N 的外积。
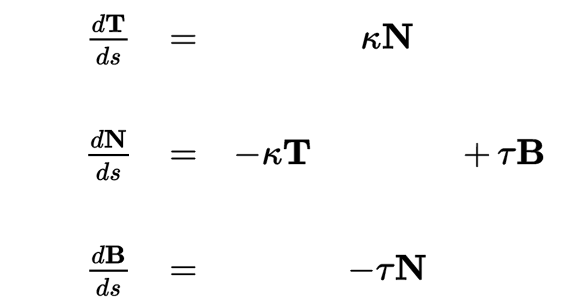
如果你不了解弗莱纳公式,你可以前往wiki阅读具体的内容。
幸亏 Three.js 我们不需要了解太多,也能让代码运行起来。我们可以使用内置的函数 path.computeFrenetFrames。
var frames = path.computeFrenetFrames(segments, true);
// True specify if the path is closed or not, in our case it must be
函数的结果是返回 Vector3() 的三组数据。
之前我们已经可以知道管道内的每一段的信息,现在我们生成一些粒子。
我们会奖粒子的三维坐标数据保存在 Geometry 中。
// Create an empty Geometry where we will insert the particles
var geometry = new THREE.Geometry();
现在我们需要将粒子放置在管道的的每一段的周围,这就是我们我马上用个循环来遍历整个管道。
// Loop through all segments
for (var i = 0; i < segments; i++) {

  // Get the normal values of the segment from the Frenet frames
  var normal = frames.normals[i];
  // Get the binormal values of the segment from the Frenet frames
  var binormal = frames.binormals[i];

  // Calculate the index of the segment (from 0 to 1)
  var index = i / segments;

  // Get the coordinates of the point in the center of the segment
  // We already used the function in the first part to move the camera along the path
  var p = path.getPointAt(index);

  // Loop for the amount of particles we want along each circle
  for (var j = 0; j < circlesDetail; j++) {

    // Clone the point in the center of the circle
    var position = p.clone();

    // We need to position every point based on an angle from 0 to Pi*2
    // If you want only half a tube (like a water slide) you could calculate the angle from 0 to Pi.
    var angle = (j / circlesDetail) * Math.PI * 2;

    // Calculate the sine of the angle
    var sin = Math.sin(angle);
    // Calculate the negative cosine of the angle
    var cos = -Math.cos(angle);

    // Calculate the normal of each point based on its angle and the normal and binormal of the segment
    var normalPoint = new THREE.Vector3(0,0,0);
    normalPoint.x = (cos * normal.x + sin * binormal.x);
    normalPoint.y = (cos * normal.y + sin * binormal.y);
    normalPoint.z = (cos * normal.z + sin * binormal.z);

    // Multiple the normal by the radius so that our tube is not a tube of 1 as radius
    normalPoint.multiplyScalar(radius);

    // Add the normal values to the center of the circle
    position.add(normalPoint);

    // Push the vector into our geometry
    geometry.vertices.push(position);
  }
}
这段代码并不很难理解,实际上这是我查看 Three.js 源码后完成的。
这个 demo 就是上面实现的效果。
创建管道
现在我们拥有包含定点的几何体,你可以借助 Three.js Points 构造函数来创建非常棒的粒子效果。你可以自定义这些粒子的纹理和颜色。
同理,我们创建 Mesh, 我们需要两个元素来创建 Points 的对象。geometry 和 material 这两个都是不可缺少的。我们之前已经定义了 geometry 接下来我们需要定义材质。
var material = new THREE.PointsMaterial({
  size: 1, // The size of each point
  sizeAttenuation: true, // If we want the points to change size depending of distance with camera
  color: 0xff0000 // The color of the points
});
接下里我们将创建的 Points 对象,添加到场景中去。
开始移动
我们需要在借鉴之前写过 render 函数中修改些代码,从而让它动起来。
var percentage = 0;
function render() {

  // Increase the percentage
  percentage += 0.0005;
  // Get the point where the camera should go
  var p1 = path.getPointAt(percentage % 1);
  // Get the point where the camera should look at
  var p2 = path.getPointAt((percentage + 0.01) % 1);
  camera.position.set(p1.x, p1.y, p1.z);
  camera.lookAt(p2);

  // Render the scene
  renderer.render(scene, camera);

  // Animation loop
  requestAnimationFrame(render);
}
See the Pen Moving particle tunnel by Louis Hoebregts (@Mamboleoo) on CodePen.
增加一些粒子的色彩
下面的动画,我添加了自定的颜色,以及添加了 Fog 到场景中去从而创建一些渐隐的效果。
// First create a new color based on the index of the vertice
var color = new THREE.Color("hsl(" + (index * 360 * 4) + ", 100%, 50%)");
// Push the color into the colors array in the Geometry object
geometry.colors.push(color);

var material = new THREE.PointsMaterial({
  size: 0.2,
  vertexColors: THREE.VertexColors // We specify that the colors must come from the Geometry
});

// Add some fog in the scene
scene.fog = new THREE.Fog(0x000000, 30, 150);
See the Pen Crazy 4 by Louis Hoebregts (@Mamboleoo) on CodePen.
实现八角的虫洞效果:
我们将这些圆都连起来了,从而创建了一些线条,并且会改变顶点的颜色,从而造成旋转的效果。
for (var i = 0; i < tubeDetail; i++) {
  // Create a new geometry for each circle
  var circle = new THREE.Geometry();
  for (var j = 0; j < circlesDetail; j++) {
    // Push the position of the vector
    circle.vertices.push(position);
  }
  // Duplicate the first vector to make sure the circle is closed
  circle.vertices.push(circle.vertices[0]);
  // Create a new material with a custom color
  var material = new THREE.LineBasicMaterial({
    color: new THREE.Color("hsl("+(noise.simplex2(index*10,0)*60 + 300)+",50%,50%)")
  });
  // Create a Line object
  var line = new THREE.Line(circle, material);
  // Insert into the scene
  scene.add(line);
See the Pen Crazy 6 by Louis Hoebregts (@Mamboleoo) on CodePen.
自己做了一个集合,搜集了这些不同的效果,你可以去 这里 查看。
如果你对这篇文章有兴趣,创建了更多酷炫的效果,你可以联系我的Twiiter。